Tao
Knowledge Help Document
Tao Knowledge is very intuitive software and extremely easy to operate, designed for maintaining and recreating a Chinese medical knowledgebase for both beginners and advanced users.
With its own massive internal knowledgebase and unique cross reference abilities you are always on top of your information, making everything easy and accessible for both doctors and students.
Better yet, information found on the web is automatically searched and inserted into your window’s view just as you go along, with no need for you to do anything besides using the software as usual.
This is not just any fixed and inflexible database! You can keep on adding as much information as you need and information you come across, and add or edit any item, with RTF (rich text format) capabilities! This way Tao Knowledge is actually always growing along with your studies and business, making all the information you’ve ever gathered accessible in a split of a second, just when you need it. Nothing is ever lost!
Activating Tao Knowledge: to activate use the ‘Activate’ command after clicking on the Office Button on the top left corner of the Ribbon as explained below.
Getting
Started
To quickly start and use Tao Knowledge it is good to know its basic structure. On the top part of the main window you can find the Ribbon. This Ribbon includes clickable buttons and tabs to help you get the information you need.
The bottom part of the window has a list-box on the left side, the items list box, to list the many items that exist on every specific index of the knowledgebase, and an information page to the right, presenting the relevant information found on each of those items.
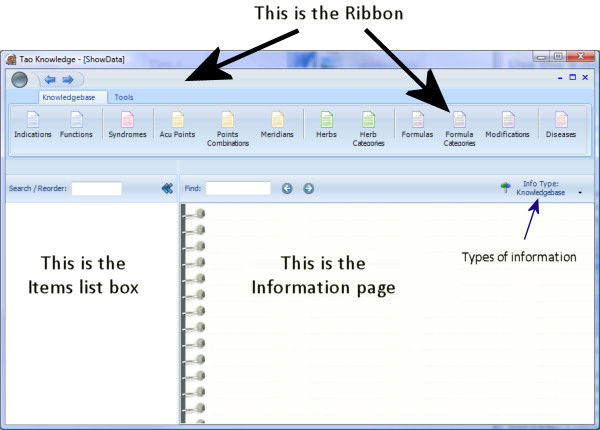
To get the available items list, simply click on any of the index buttons. For example, clicking the ‘Syndromes’ button will load all of the available syndromes and will list them in the Items List box. Selecting any of the items in the list will present the information on the Information page.
Ribbon
/ Toolbar:
(Located on
the top part of the screen)
The menus and toolbars have been replaced with what is called the Ribbon, which was introduced in Office 2007 as Microsoft Office Fluent user interface. This serves as a better and more intuitive way of operating the product.
The Ribbon is designed to help you quickly find the commands that you need to complete a task. Commands are organized in logical groups, which are collected together under tabs. Each tab relates to a type of activity, such as Knowledgebase and Tools.
The Ribbon has two tabs: Knowledgebase and Tools.
The knowledgebase has buttons that list the different indexes, such as, Indications, Syndromes, Acu points, Herbs etc. Clicking any of the index-buttons will show the list of items on the list box to the left of the screen.
The Tools tab allows other options, such as searching and printing.
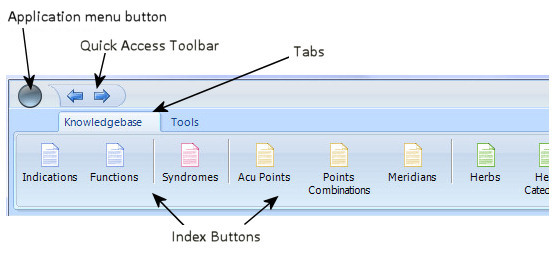
Minimize the Ribbon: to quickly minimize the Ribbon, double-click the name of the active tab. Double-click a tab again to restore the Ribbon.
Keyboard shortcut: to minimize or restore the Ribbon, press CTRL+F1.
Quick Access Toolbar: the quick access toolbar has two arrow buttons. These buttons enable forward and backward navigation of the items that were selected, enabling to go back to prior selected items and navigate forward again. It is also possible to select a previously shown page by using the Office Button.
Application menu button: the button on the top left corner of the Ribbon is called Office Button. Clicking this button will enable you to use additional options and commands. Two such options are ‘Search’ and ‘Activate’. Other options are the ‘Properties’ and ‘Exit’ buttons.
Items
list box:
(Located on the left part of
the screen)
The Items list box lists the available items for each of the chosen indexes, for example, all of the available items for the Indications index, or all of the various Chinese Syndrome items available.
Clicking any item in this list box will illustrate the information related to it, on the information page to the right. The information can be from the internal knowledgebase or from the web, depending on the information type selected, as explained on the Information page section below.
Right clicking any item on the list with the mouse will enable adding a new item to the current index or editing the selected items. For example, you can add a new Indication to the list.
Search / Reorder:
Besides scrolling down and up with the mouse or keyboard keys (up/down arrows and PageUp/PageDn) it is also possible to use the keyboard character keys to move the list to the appropriate place. For example, when in the Herb index list, clicking the letter ‘f’ immediately followed by ‘u’ will forward the list, and the ‘Fu Hai Shi’ herb or something similar will be selected.
Another extremely efficient way to search and reorder the list is to use the edit box at the top of the list. Any characters keyed into this box will sort the items by placing the found items on the top, and will also mark them as ‘bold’ and will color them as ‘red’.
For example, if we’ll key ‘ji’ into this box, all of the herbs which include ‘ji’ in their names will be listed first, and the ‘ji’ part will be marked red and bold. Tip: we can add a space, and have the word ‘ji ‘ to look for names with ‘ji’ which is not a part of a word.
Note: it is possible to click the arrow on the top right corner of the list box in order to minimize or maximize the width of the box. It is also possible to change the width by placing the mouse cursor on the right border of the list box and drag to enlarge or minimize the width.
Information
page:
(Located on the right side of
the screen)
The Information page presents all of the relevant information related to the item that was selected on the items list. It is important to note that there are several information types available. The required type is selected from the ‘Info Type’ button at the top right. The following are the available information type’s options:
Types of information:
1. Internal knowledgebase
2. Online web info
3. Web discussion groups
1. Internal knowledgebase type:
This is the most usable mode. It will present the available information of the selected item in the internal knowledgebase that is a part of the product. The internal knowledgebase is expandable and can include everything you add to it during the time you use the product.
2. Online web info type:
In this mode the information found on the web will be presented. This is created by using internal search algorithms that automatically use web search engines to locate available information. The internal search algorithm will try to locate information even if the initial search will not succeed, and at times even open two search engine pages in parallel mode to expose as much relevant information as possible. This is all done automatically and quickly, without any need for the user to do anything.
3. Web
discussion groups type:
This mode is similar to the above second option since it browses the web for information, however, in this mode the search is not done using the normal web pages but rather uses a search algorithm to find information on the various discussion groups and professional forums on the internet, enabling you to read some of the questions and answers on the item you’ve selected.
Find:
This box helps in finding words in the text below. This box is available when in ‘Internal knowledgebase’ type. Typing any number of characters (two and above) into the box will highlight the first word that matches these characters in the information text below. Clicking the right-arrow to the right of the box will move the selection to the next instance of a matching word in the text (if found). The left-arrow will move to the previously found instance.
Adding/Editing/deleting the various items and texts in the information page is easy.
My Info: Clicking this button will open the My Info section. This part includes information you’ve entered as an addition to other sections in the same index. Once opened the icon changes light from red to green, and will stay open for all indexes until clicked again.
My Links: Clicking this button will open the My Links section. This part includes links to information found on the internet. You can enter new links using the Edit button on the right. The links will be active and clicking them will open your browser to go to the clicked address (if your system is set correctly). Once opened the icon changes light from red to green, and will stay open for all indexes until clicked again.
Adding new links: Clicking the Edit button on the My Links section will enable you to manage the links and add new ones. You can add by clicking the Add button on the toolbar of this window, or click Edit to edit the selected item. When adding or editing, you need to enter a title, an address and a description. The title is the text that will appear on the My Links section. The address is the place that your browser will be directed to when clicking the title. Description is not necessary, but can include remarks or other hidden information about the specific link.
Working
with the information
Indications
The Items List Box on the left will show the list of all available indications found in the knowledgebase. To add, edit or delete an item, select it and then right click with the mouse. Clicking any Indication from the list will illustrate the information related to it on the Information Page.
The Information page will contain a body system and body part related to the indication, and various tables with cross-references of the Indication to other indexes, such as Syndromes, Herbal formulas, Acu-points etc. Clicking on any one of these cross-references will navigate to that item and will show the complete information related to it that is available in the inner knowledgebase or on the web.
You can change the body system and part related to the Indication by clicking the Edit button on the right corner. Then, in the edit window, you can either delete an item by clicking the recycler icon to the right of the row, or add a new item by selecting one from the list at the bottom right, and then clicking the Add to list button.
You can add, edit or delete any of the cross-references on the Information page by clicking the Change button on the right of each table. Then, in the edit window, you can either delete an item by clicking the recycler icon to the right of the row, or add a new item by selecting one from the list at the bottom right, and then clicking the Add to list button.
Functions
The Items List Box on the left will show the list of all available functions found in the knowledgebase. To add, edit or delete an item, select it and then right click with the mouse. Clicking any function from the list will illustrate the information related to it on the Information Page.
The Information page will contain lists of related formulas, herbs, etc. if available for the specific function. Clicking on any one of these items will navigate to the item and will show the complete information related to it that is available in the inner knowledgebase or on the web.
You cannot change the various existing relations from this page. In order to change you need to navigate to the related item, for example click on a certain related point, and make the change from the Functions section of that item’s page.
Syndromes
The Items List Box on the left will show the list of all available syndromes found in the knowledgebase. To add edit or delete an item, select it and then right click with the mouse. Clicking any syndrome from the list will illustrate the information related to it on the Information Page.
The Information page will contain the pathology, etiology, treatment, method and nutrition related to the syndrome, and various tables with cross-references of the syndrome to other indexes, such as Indications, Herbal Formulas, Acu-Points, etc. Clicking on any one of these cross-references will navigate to that item and will show the complete information related to it that is available in the inner knowledgebase or on the web.
You can change the pathology, etiology, treatment, method and nutrition related to the syndrome by clicking the Edit button on the right corner. Then, in the edit window, you can change and add any text you like, in a rich text format, just like any standard text editor. After clicking the OK button the changes will immediately be reflected in the Information page.
You can add, edit or delete any of the cross-references on the Information page by clicking the Change button on the right of each table. Then, in the edit window, you can either delete an item by clicking the recycler icon to the right of the row, or add a new item by selecting one from the list at the bottom right, and then clicking the Add to list button.
Acu Points
The Items List Box on the left will show the list of all available body/ear/extra points found in the knowledgebase. To add, edit or delete an item, select it and then right click with the mouse. Clicking any point from the list will illustrate the information related to it on the Information Page.
The Information page will contain the image, Chinese name, the functions, nature/quality and the meridian the point related to (if such information exists in the knowledgebase), and description of the place and technique. Below the description, there will be various tables with cross-references of the point to other indexes, such as Indications, Syndromes, Combinations, etc. Clicking on any one of these cross-references will navigate to that item and will show the complete information related to it that is available in the inner knowledgebase or on the web.
You can change the Chinese name, the functions, nature/quality and the meridian related to the point by clicking the Edit button on the right corner. Then, you can edit the name, or edit the functions using the edit window, where you can either delete an item by clicking the recycler icon to the right of the row, or add a new item by selecting one from the list at the bottom right, and then clicking the Add to list button.
Manage nature/quality: in the edit window the indexes are listed on the left and clicking any one of them will list the points on the right window. You can right click over any index or point in order to manage it.
Nature items will have the blue triangle icon and the quality items will be marked by the gray circle icon, collected at the bottom of the list. Double-clicking a nature line that is marked with a small triangle on the left will open the sub-list of the contained items.
You can change the place and technique related to the point by clicking the Edit button on the right corner. Then, in the edit window, you can change and add any text you like, in a rich text format, just like any standard text editor. After clicking the OK button the changes will immediately be reflected in the Information page.
You can add, edit or delete any of the cross-references on the Information page by clicking the Change button on the right of each table. Then, in the edit window, you can either delete an item by clicking the recycler icon to the right of the row, or add a new item by selecting one from the list at the bottom right, and then clicking the Add to list button.
Points Combinations
The Items List Box on the left will show the list of all available points combinations found in the knowledgebase. To add, edit or delete an item, select it and then right click with the mouse. Clicking any combination from the list will illustrate the information related to it on the Information Page.
The Information page will contain lists of related functions – if available for the specific combination. Clicking on any one of the functions will navigate to that item and will show the complete information related to it that is available in the inner knowledgebase or on the web.
Below the description, there will be various tables with cross-references of the combination to other indexes, such as Points, Indications, etc. Clicking on any one of these cross-references will navigate to that item and will show the complete information related to it that is available in the inner knowledgebase or on the web.
You can change the description related to the combination by clicking the Edit button on the right corner. Then, in the edit window, you can change and add any text you like, in a rich text format, just like any standard text editor. After clicking the OK button the changes will immediately be reflected in the Information page.
You can add, edit or delete any of the cross-references on the Information page by clicking the Change button on the right of each table. Then, in the edit window, you can either delete an item by clicking the recycler icon to the right of the row, or add a new item by selecting one from the list at the bottom right, and then clicking the Add to list button.
Meridians
The Items List Box on the left will show the list of all available meridians found in the knowledgebase. To add, edit or delete an item, select it and then right click with the mouse. Clicking any meridian from the list will illustrate the information related to it on the Information Page.
The Information page will contain the meridian’s chart and a description. Clicking the image will open an enlarged view of the image, illustrating the points on it. Clicking on any point on this image will navigate to that point information in the points list.
You can change the description related to the meridian by clicking the Edit button on the right corner. Then, in the edit window, you can change and add any text you like, in a rich text format, just like any standard text editor. After clicking the OK button the changes will immediately be reflected in the Information page.
Herbs
The Items List Box on the left will show the list of all available herbs found in the knowledgebase. To add, edit or delete an item, select it and then right click with the mouse. Clicking any herb from the list will illustrate the information related to it on the Information Page.
The Information page will contain the image, pharmacological and common names, the herb category and functions, and dosages of the herb (if such information exists in the knowledgebase), and also the chemical composition, drug interaction and description of the herb. Below the description, there will be various tables with cross-references of the herb to other indexes, such as Indications, Formulas, Modifications etc. Clicking on any one of these cross-references will navigate to that item and will show the complete information related to it that is available in the inner knowledgebase or on the web.
You can change the names, category, functions, and dosages related to the herb by clicking the Edit button on the right corner. Then, you can edit the names, or edit the category and functions using the edit window, where you can either delete an item by clicking the recycler icon to the right of the row, or add a new item by selecting one from the list at the bottom right, and then clicking the Add to list button.
You can change the chemical composition, drug interaction and description related to the herb by clicking the Edit button on the right corner. Then, in the edit window, you can change and add any text you like, in a rich text format, just like any standard text editor. After clicking the OK button the changes will immediately be reflected in the Information page.
You can add edit or delete any of the cross-references on the Information page by clicking the Change button on the right of each table. Then, in the edit window, you can either delete an item by clicking the recycler icon to the right of the row, or add a new item by selecting one from the list at the bottom right, and then clicking the Add to list button.
Herb Categories
The Items List Box on the left will show the list of all available herb categories found in the knowledgebase. To add, edit or delete an item, select it and then right click with the mouse. Clicking any category from the list will illustrate the information related to it on the Information Page.
The Information page will contain lists of related herbs – if available, for the specific category. Clicking on any one of these items will navigate to that item and will show the complete information related to it that is available in the inner knowledgebase or on the web.
You cannot change the various existing relations from this page. In order to change you need to navigate to the related herb, and make the change from the category section of that herb’s page.
Formulas
The Items List Box on the left will show the list of all available formulas found in the knowledgebase. To add, edit or delete an item, select it and then right click with the mouse. Clicking any formula from the list will illustrate the information related to it on the Information Page. Note: this is also the way to add a new combination.
The Information page will contain the English name, the category and functions, pulse and tongue, and any combinations for the formula (if such information exists in the knowledgebase), and also the description of the formula. Below the description, there will be various tables with cross-references of the formula to other indexes, such as Indications, Syndromes, etc. Clicking on any one of these cross-references will navigate to that item and will show the complete information related to it that is available in the inner knowledgebase or on the web.
You can change the name, category, functions, pulse and tongue related to the formula by clicking the Edit button on the right corner. Then, you can edit the name, or edit the category functions or pulse tongues using the edit window, where you can either delete an item by clicking the recycler icon to the right of the row, or add a new item by selecting one from the list at the bottom right, and then clicking the Add to list button.
You can change the description related to the formula by clicking the Edit button on the right corner. Then, in the edit window, you can change and add any text you like, in a rich text format, just like any standard text editor. After clicking the OK button the changes will immediately be reflected in the Information page.
You can add, edit or delete any of the cross-references on the information page by clicking the Change button on the right of each table. Then, in the edit window, you can either delete an item by clicking the recycler icon to the right of the row, or add a new item by selecting one from the list at the bottom right, and then clicking the Add to list button.
Formula Categories
The Items List Box on the left will show the list of all available formula categories found in the knowledgebase. To add, edit or delete an item, select it and then right click with the mouse. Clicking any category from the list will illustrate the information related to it on the Information Page.
The Information page will contain lists of related formulas – if available for the specific category. Clicking on any one of these items will navigate to that item and will show the complete information related to it that is available in the inner knowledgebase or on the web.
You cannot change the various existing relations from this page. In order to change you need to navigate to the related formula, and make the change from the category section of that formula’s page.
Modifications
The Items List Box on the left will show the list of all available formula modifications found in the knowledgebase. To add a new combination you need to go to the needed formula on the formulas page. To delete a specific combination you can use the menu from the Edit button on the right of that combination.
In the Information page you can also scroll to the bottom in order to get the description of the original formula.
Diseases
The Items List Box on the left will show the list of all available diseases names found in the knowledgebase. To add, edit or delete an item, select it and then right click with the mouse. Clicking any disease from the list will illustrate the information related to it on the Information Page.
The Information page will contain the description, etiology, and indication related to the disease. The related syndromes appear on the top of the page. Clicking on any one of these syndromes will navigate to that item and will show the complete information related to it that is available in the inner knowledgebase or on the web.
The body system of the selected disease will appear at the top. To edit the body system or related syndrome you can click the Edit button on the right.
You can change the description, etiology, and indication related to the disease by clicking the Edit button on the right corner. Then, in the edit window, you can change and add any text you like, in a rich text format, just like any standard text editor. After clicking the OK button the changes will immediately be reflected in the Information page.
Knowledgebase Search
This option allows you to search a specific word or words in the entire knowledgebase and quickly locate the requested items related to it.
For example, if you want to find all of the formulas and herbs information that the word ‘liver’ is used in, simply type that word into the search box, and check the ‘Search in Formulas’ and ‘Search in Herbs’ checkboxes under the Places to search.
You can also use several search words, for example ‘damp cold’ and even choose whether to show the result where all of the words are found on one item or show any information in which at least one of the words is found.
Clicking ‘Go search’ button will start the search and then place the resulting items in the Items List box.
Properties
The property window let you change a few global options of the product. You can change the color of the Ribbon and the size of the headers and links that appear on the Information page.
You can also decide if the left side of the Information page will show a spiral image or not, according to your taste.
Print
This option will print the current index. If no index is currently selected this option will not function. Your default printer settings will be used to print the page. If you need to change the default settings please do so by using the printer’s driver installed in windows.
Database Management
It is important to keep your information safe and tuned correctly. Using the backup and restore function of the product you can save lost data in case of computer damage or system failure. You can also compact and fix errors in your database structure.
To use these functions you can use your Ribbon tabs and choose Tools.
Back up
Using this option will let you back up your complete knowledgebase, the original one that came with the product along with any additions or changes you’ve made to it. After clicking the backup button you will be able to choose a name and place to save your data under. A default name will appear, containing the date, and it is suggested you use that.
Restore
To restore any backups you’ve made before, you can use the Restore Knowledgebase button. Clicking this button will let you choose the file name the backup is saved under, and will transfer it to the correct place and correct name, to be used within the product.
Note: this operation will delete the existing knowledgebase that is currently being used inside the product. You should be careful and use restore only when it is absolutely necessary.
Compact / Repair
If you regularly make changes and additions to the knowledgebase it is advisable to use the compact option on a monthly basis. This will keep the size as small as possible and will empty unused spaces, keeping the database maintained efficiently.
Database file data corruption could occur due to many reasons, such as hard disk failure, power loss or improper operating system shutdown. Using the compact/repair option will always make the attempt to fix any such errors – if they exist. If you cannot fix a damaged database you should restore your latest backups using the restore option.